<?xml version="1.0" encoding="utf-8"?><feed xmlns="http://www.w3.org/2005/Atom" ><generator uri="https://jekyllrb.com/" version="3.10.0">Jekyll</generator><link href="https://www.rondeau-clement.eu//feed.xml" rel="self" type="application/atom+xml" /><link href="https://www.rondeau-clement.eu//" rel="alternate" type="text/html" /><updated>2026-11-05T17:21:24+00:00</updated><id>https://www.rondeau-clement.eu//feed.xml</id><title type="html">Portfolio</title><subtitle>I&apos;m a student @CNAM-Enjmin and I love making video games.
</subtitle><entry><title type="html">Atomic Lemon</title><link href="https://www.rondeau-clement.eu//projects/school-project/2018/03/01/Atomic-Lemon.html" rel="alternate" type="text/html" title="Atomic Lemon" /><published>2018-03-01T06:30:00+00:00</published><updated>2018-03-01T06:30:00+00:00</updated><id>https://www.rondeau-clement.eu//projects/school-project/2018/03/01/Atomic%20Lemon</id><content type="html" xml:base="https://www.rondeau-clement.eu//projects/school-project/2018/03/01/Atomic-Lemon.html"><![CDATA[<p>Atomic Lemon is our end of year school project consisting in making the vertical slice of a game in 4 months.</p>

<p>It’s a 3D side scrolling beat’em up game. You play as Lemon, a young girl who fights for the salvation of her favela with her fists and with street art, accompanied by her sidekick, the graffiti of a sloth moving on the walls.
The player control Lemon and the Sloth at the same time and must fight enemies that can move in 3D in the arena and in 2D on the walls.</p>]]></content><author><name></name></author><category term="school-project" /><summary type="html"><![CDATA[Atomic Lemon is a **3D side scrolling beat'em up game** where you play as Lemon, a young girl who fights for the salvation of her favela with her fists and with street art.]]></summary></entry><entry><title type="html">Create a master volume controller with Wwise and Unity</title><link href="https://www.rondeau-clement.eu//blog/2018/01/06/Create-a-master-volume-control-with-Wwise-and-Unity.html" rel="alternate" type="text/html" title="Create a master volume controller with Wwise and Unity" /><published>2018-01-06T09:00:00+00:00</published><updated>2018-01-06T09:00:00+00:00</updated><id>https://www.rondeau-clement.eu//blog/2018/01/06/Create%20a%20master%20volume%20control%20with%20Wwise%20and%20Unity</id><content type="html" xml:base="https://www.rondeau-clement.eu//blog/2018/01/06/Create-a-master-volume-control-with-Wwise-and-Unity.html"><![CDATA[<p>This tutorial will show you how to create a master volume controller with Wwise and Unity. The volume will be changed with a RTPC so we can control it in Unity.</p>

<p>First of all we need a Unity project that already has the Wwise integration. Then in the Wwise project we’re going to create the RTPC that will control the volume, and a new sound to test it.</p>

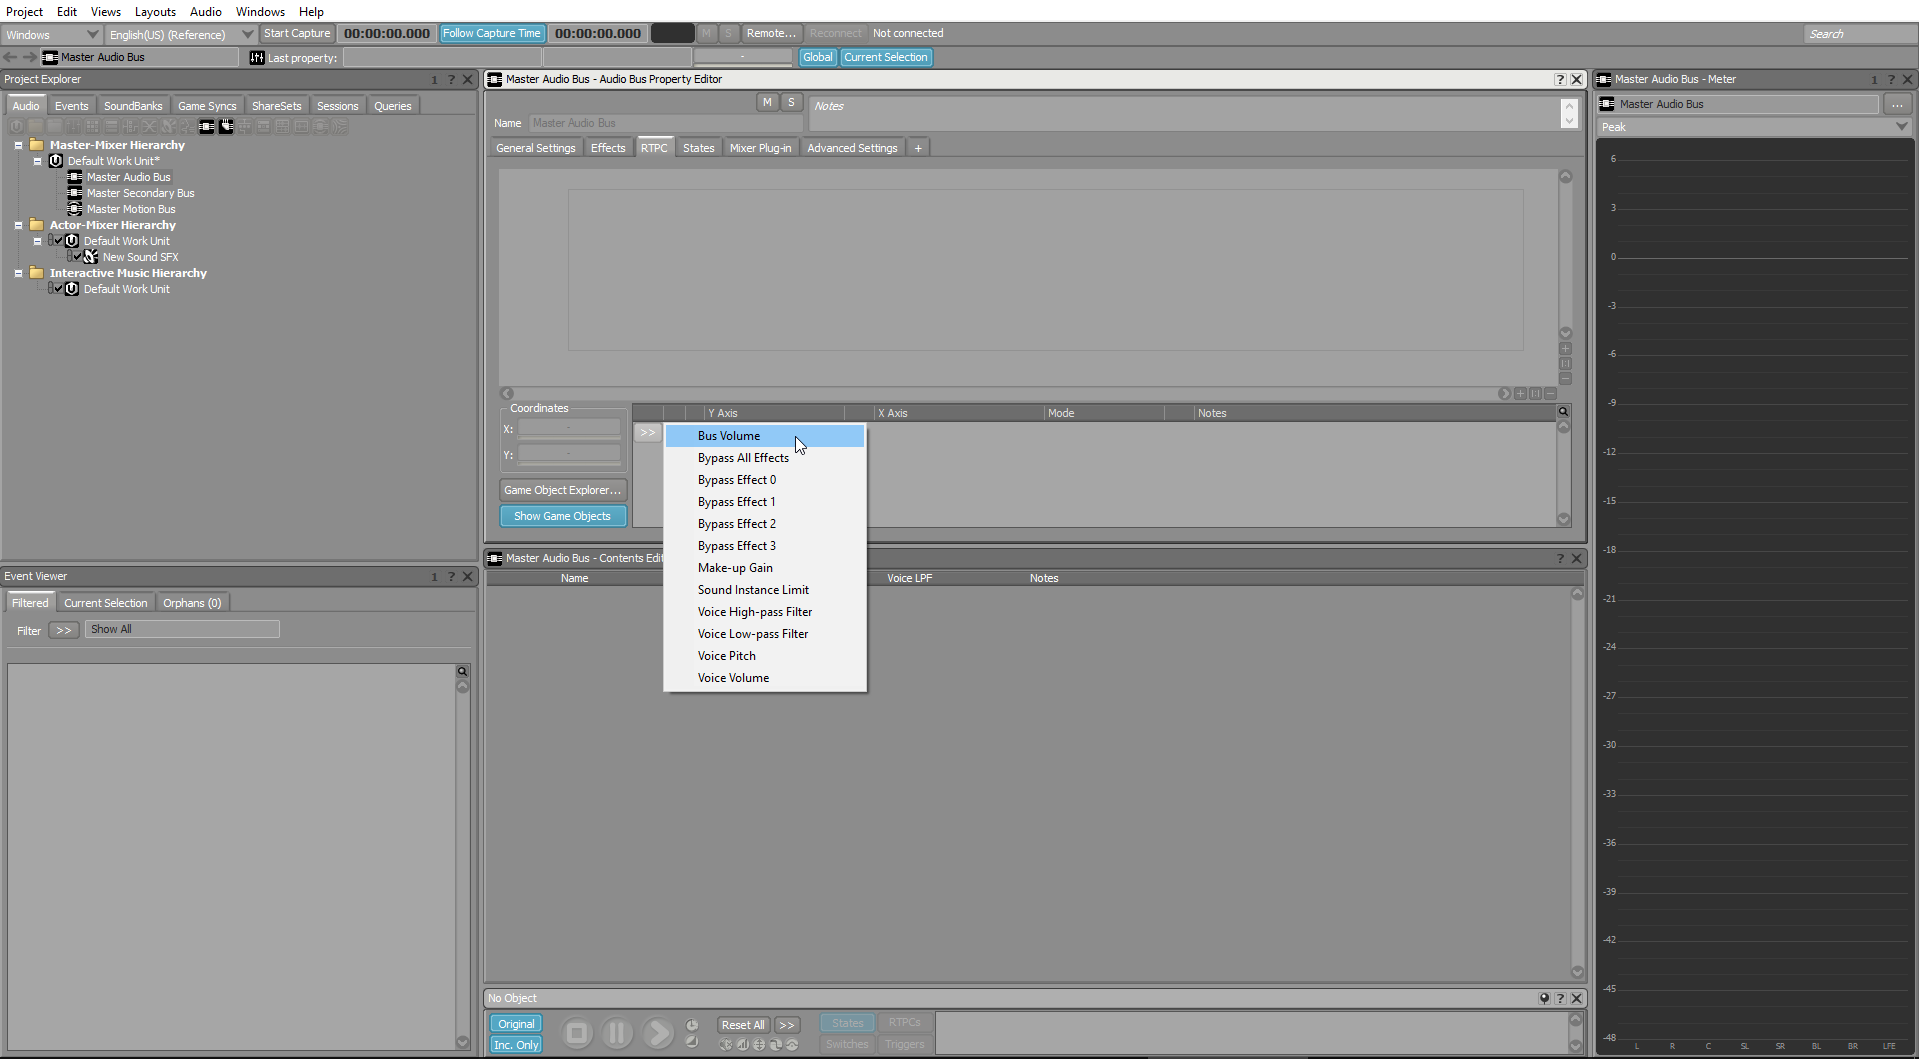
<p>First we need to create the RTPC. We select the <strong>Master Audio Bus</strong> and then go to the RTPC tab and add a new RTPC by clicking the <strong>»</strong> button and choosing <strong>Bus Volume</strong>.</p>

<div class="onpage-screenshot">
	<img data-lity="" class="img-100" src="/assets/blog_master_volume/01_create_rtpc.png" />
</div>

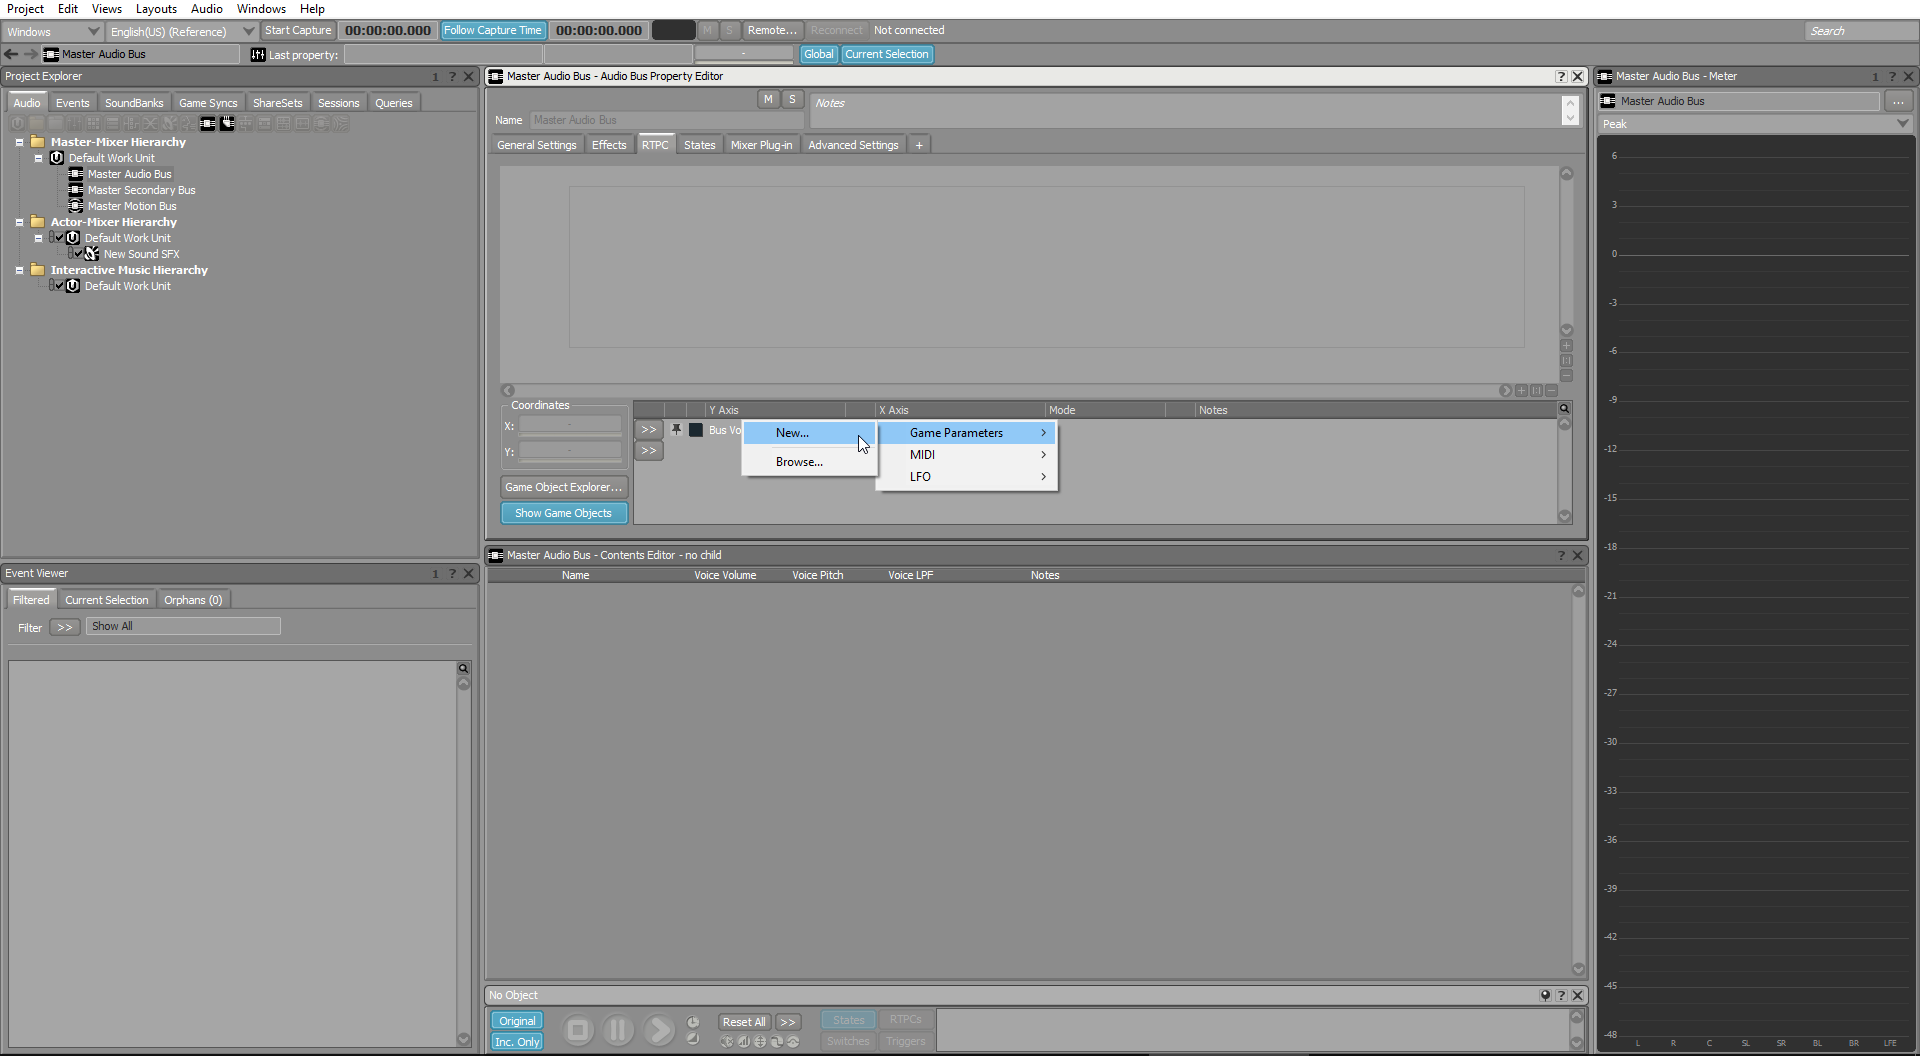
<p>We can then click on the <strong>»</strong> button on the left of our new RTPC to add a new <strong>Game Parameter</strong>.</p>

<div class="onpage-screenshot">
	<img data-lity="" class="img-100" src="/assets/blog_master_volume/02_create_game_parameter.png" />
</div>

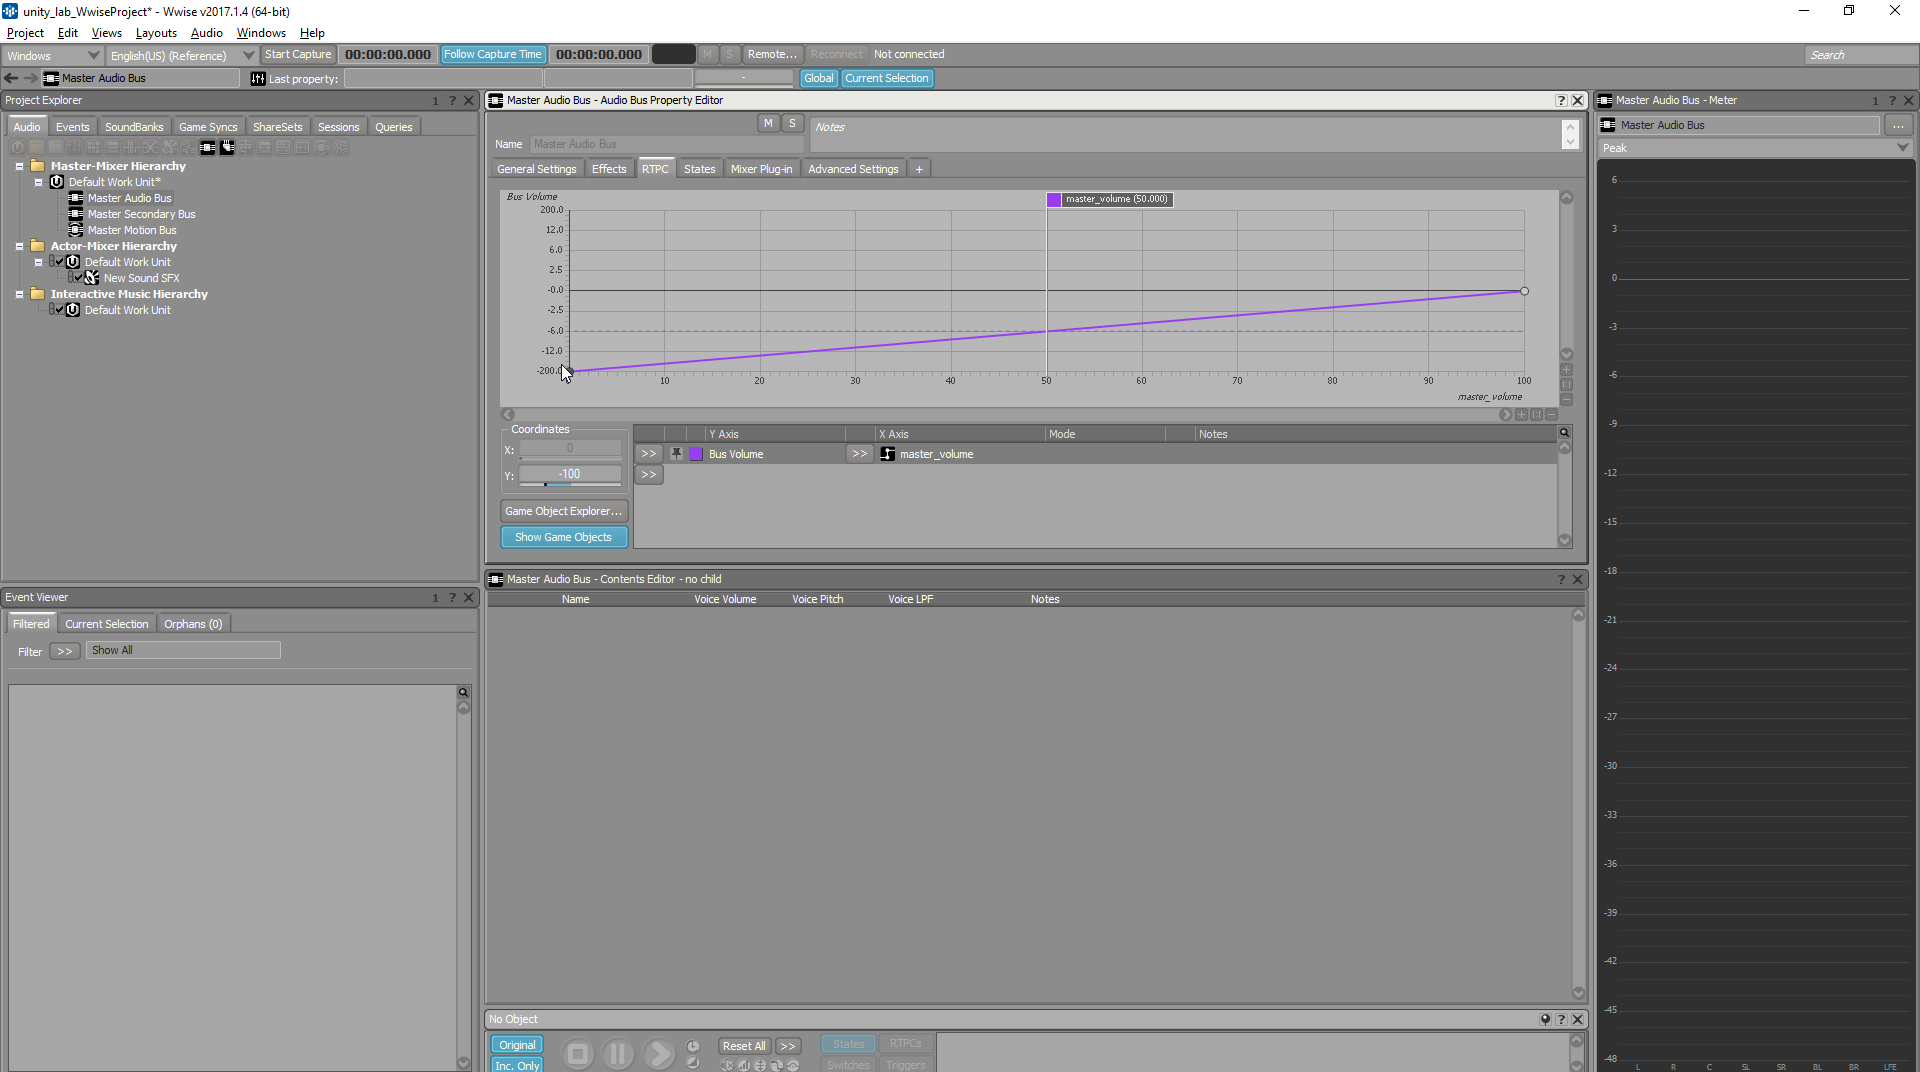
<p>Choose a name and the RTPC should appear. Then click on it to show the curve and select the left handle to change its value from 200 to 100.</p>

<div class="onpage-screenshot">
	<img data-lity="" class="img-100" src="/assets/blog_master_volume/03_change_left_handle_value.png" />
</div>

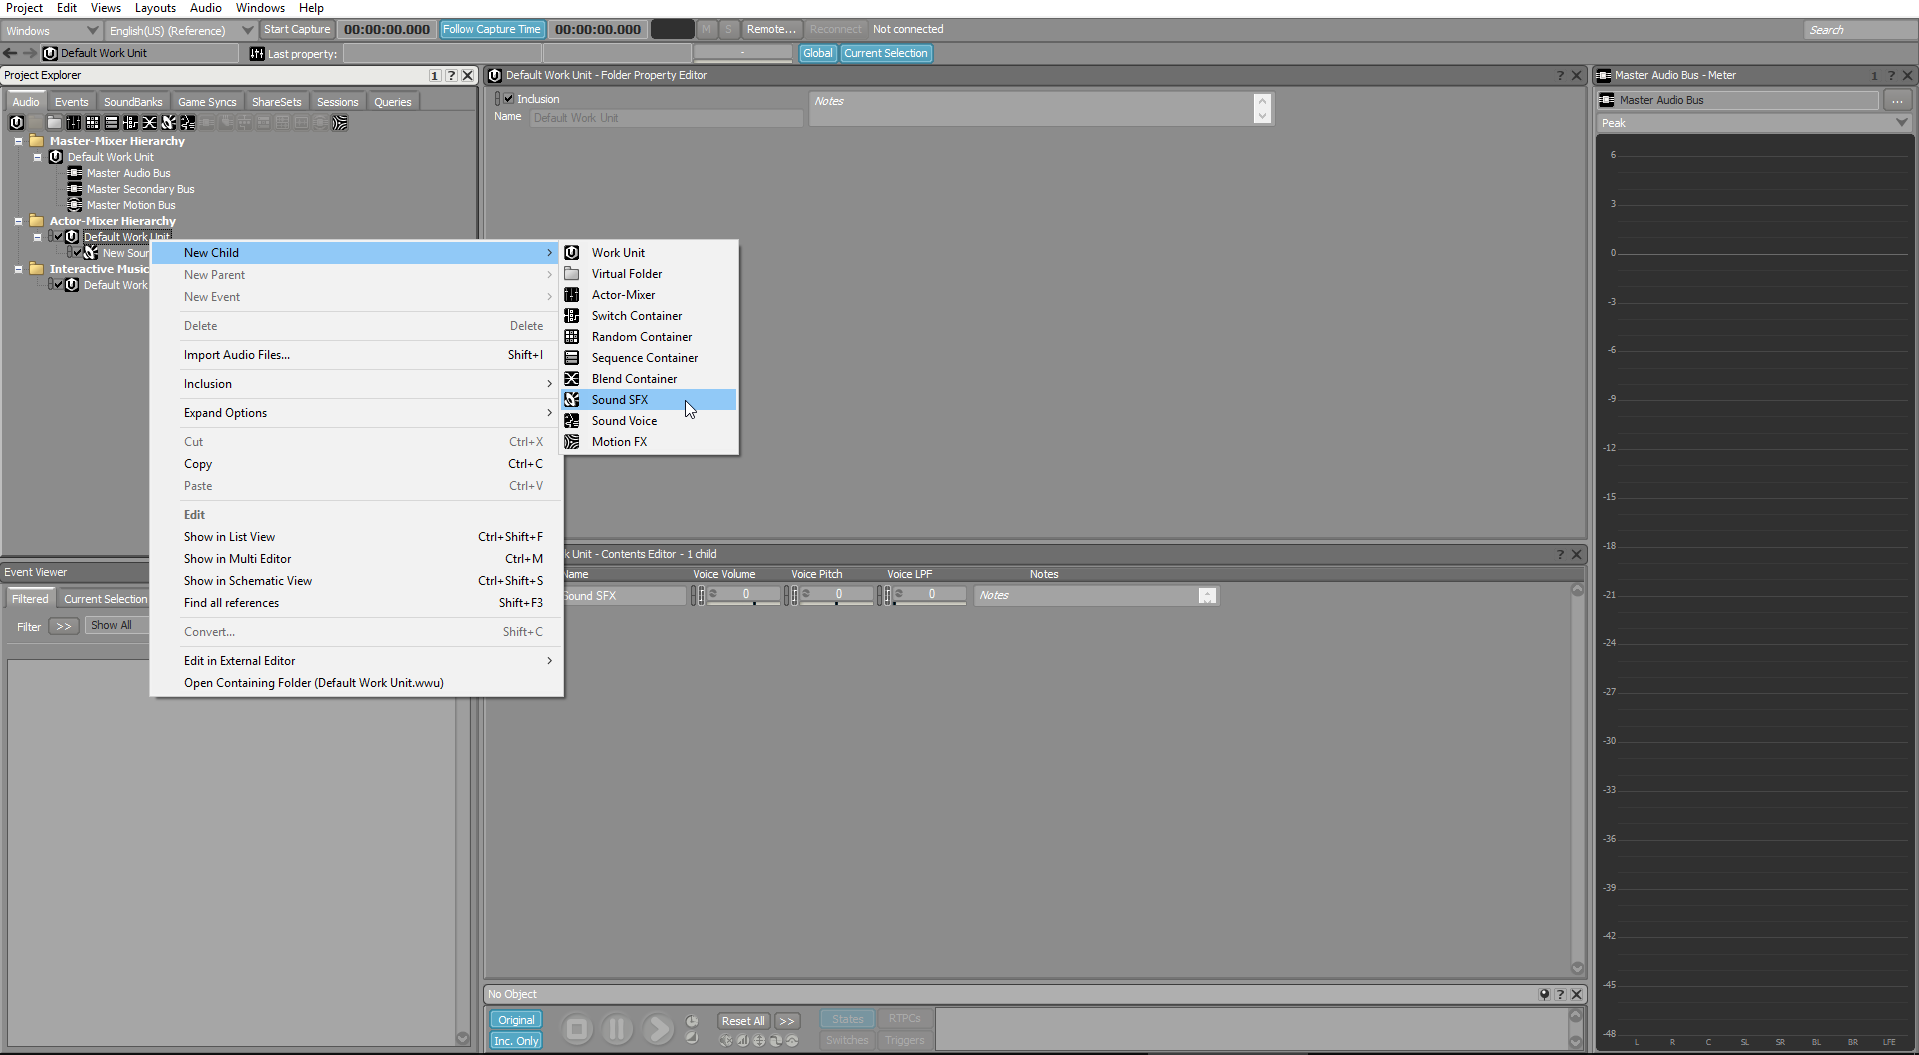
<p>Now we can add a new sound to test our new RTPC. Right-click on the <strong>Default Work Unit</strong> and a new <strong>Sound SFX</strong> child</p>

<div class="onpage-screenshot">
	<img data-lity="" class="img-100" src="/assets/blog_master_volume/04_create_new_sound_sfx.png" />
</div>

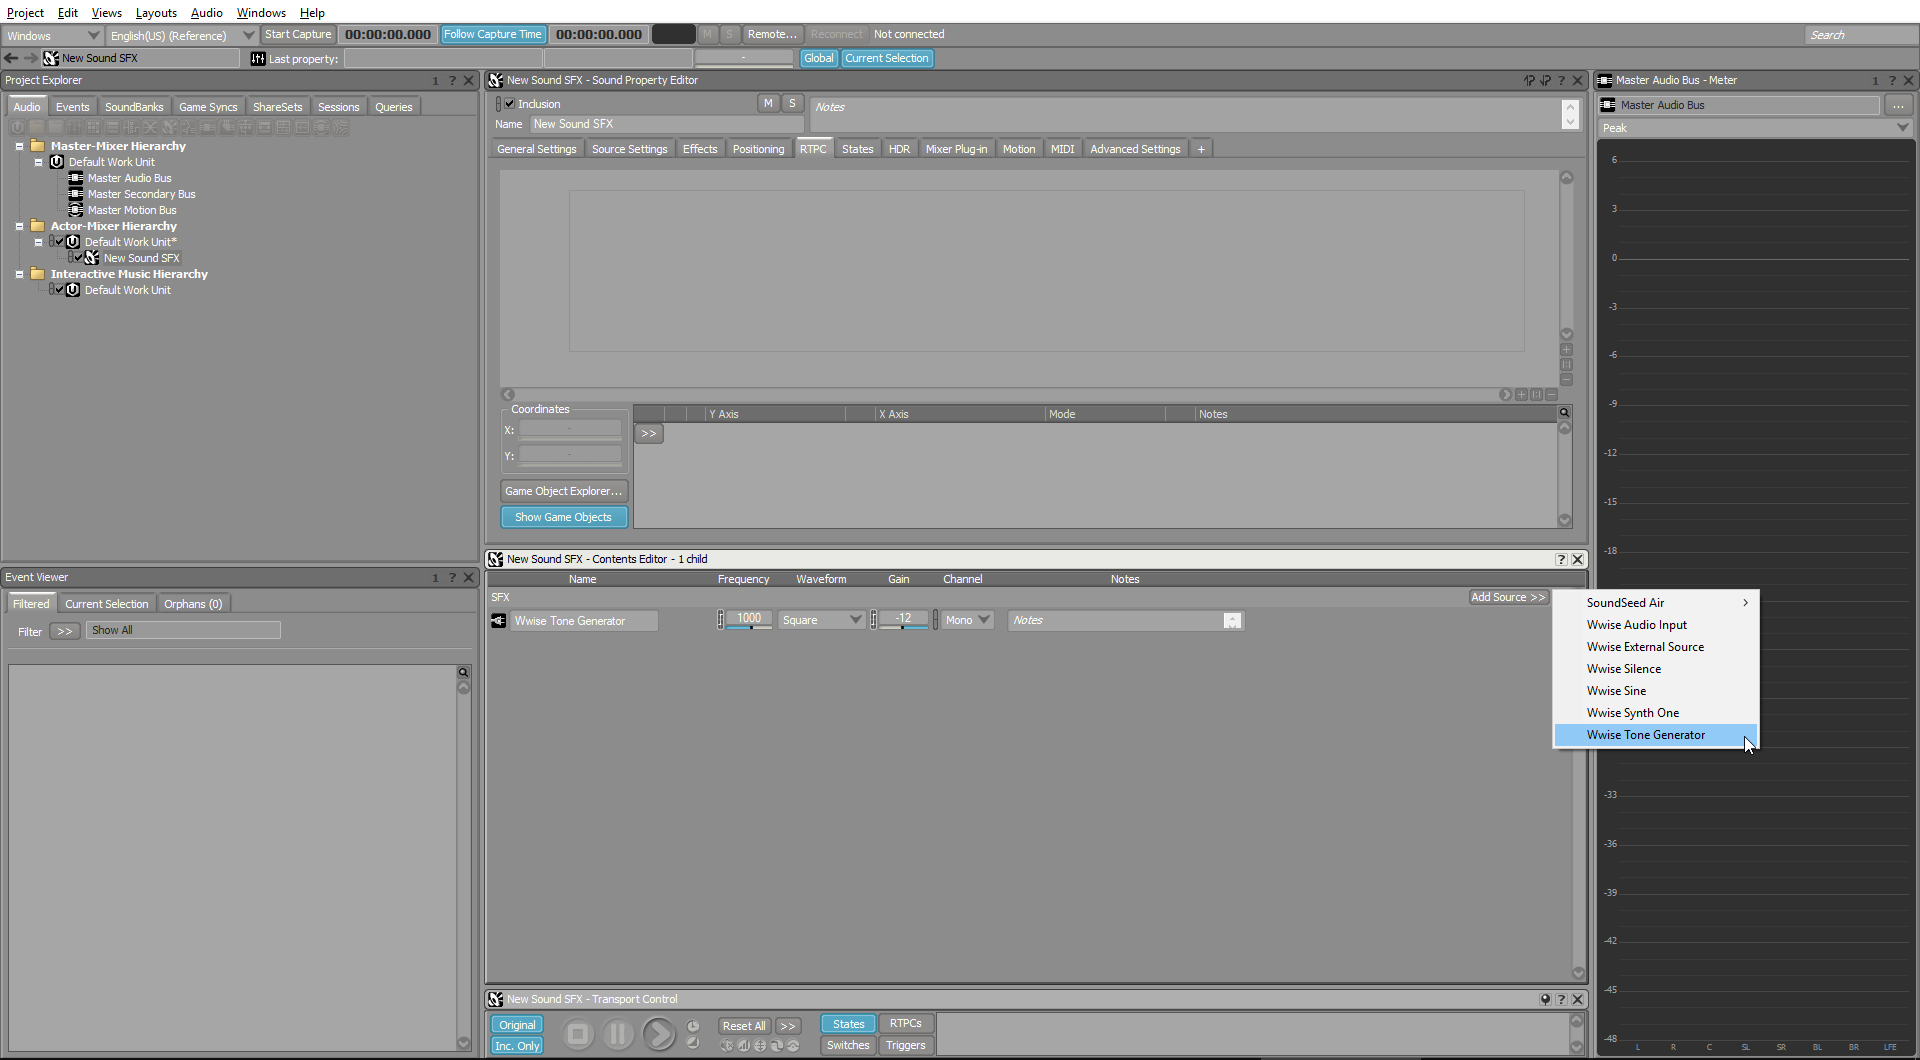
<p>Add a new source to our sound by clicking the <strong>Add source button</strong> and select <strong>Wwise Tone Generator</strong>.</p>

<div class="onpage-screenshot">
	<img data-lity="" class="img-100" src="/assets/blog_master_volume/05_add_new_source.png" />
</div>

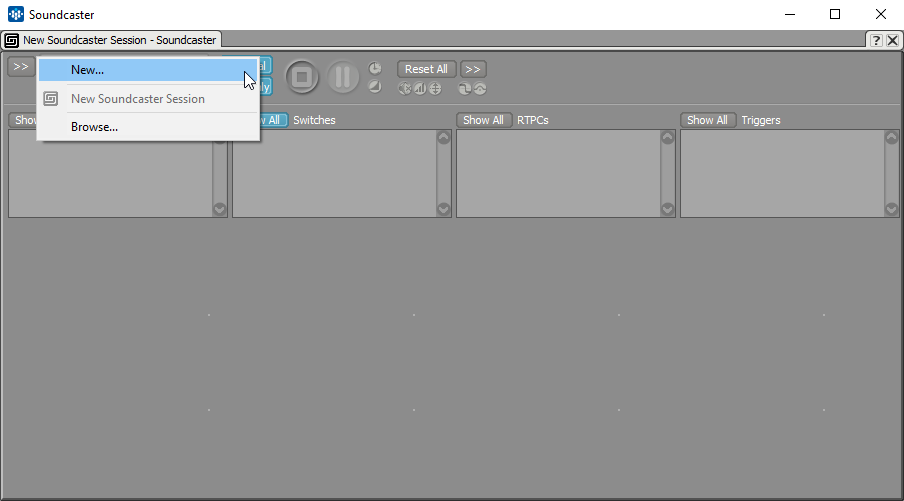
<p>We’re now ready to test this sound in the soundcaster, to open it strike the <strong>SHIFT + S</strong> shortcut and create a new session by clicking the <strong>»</strong> button and <strong>New…</strong> option.</p>

<div class="onpage-screenshot">
	<img data-lity="" class="img-100" src="/assets/blog_master_volume/06_create_soundcaster_session.png" />
</div>

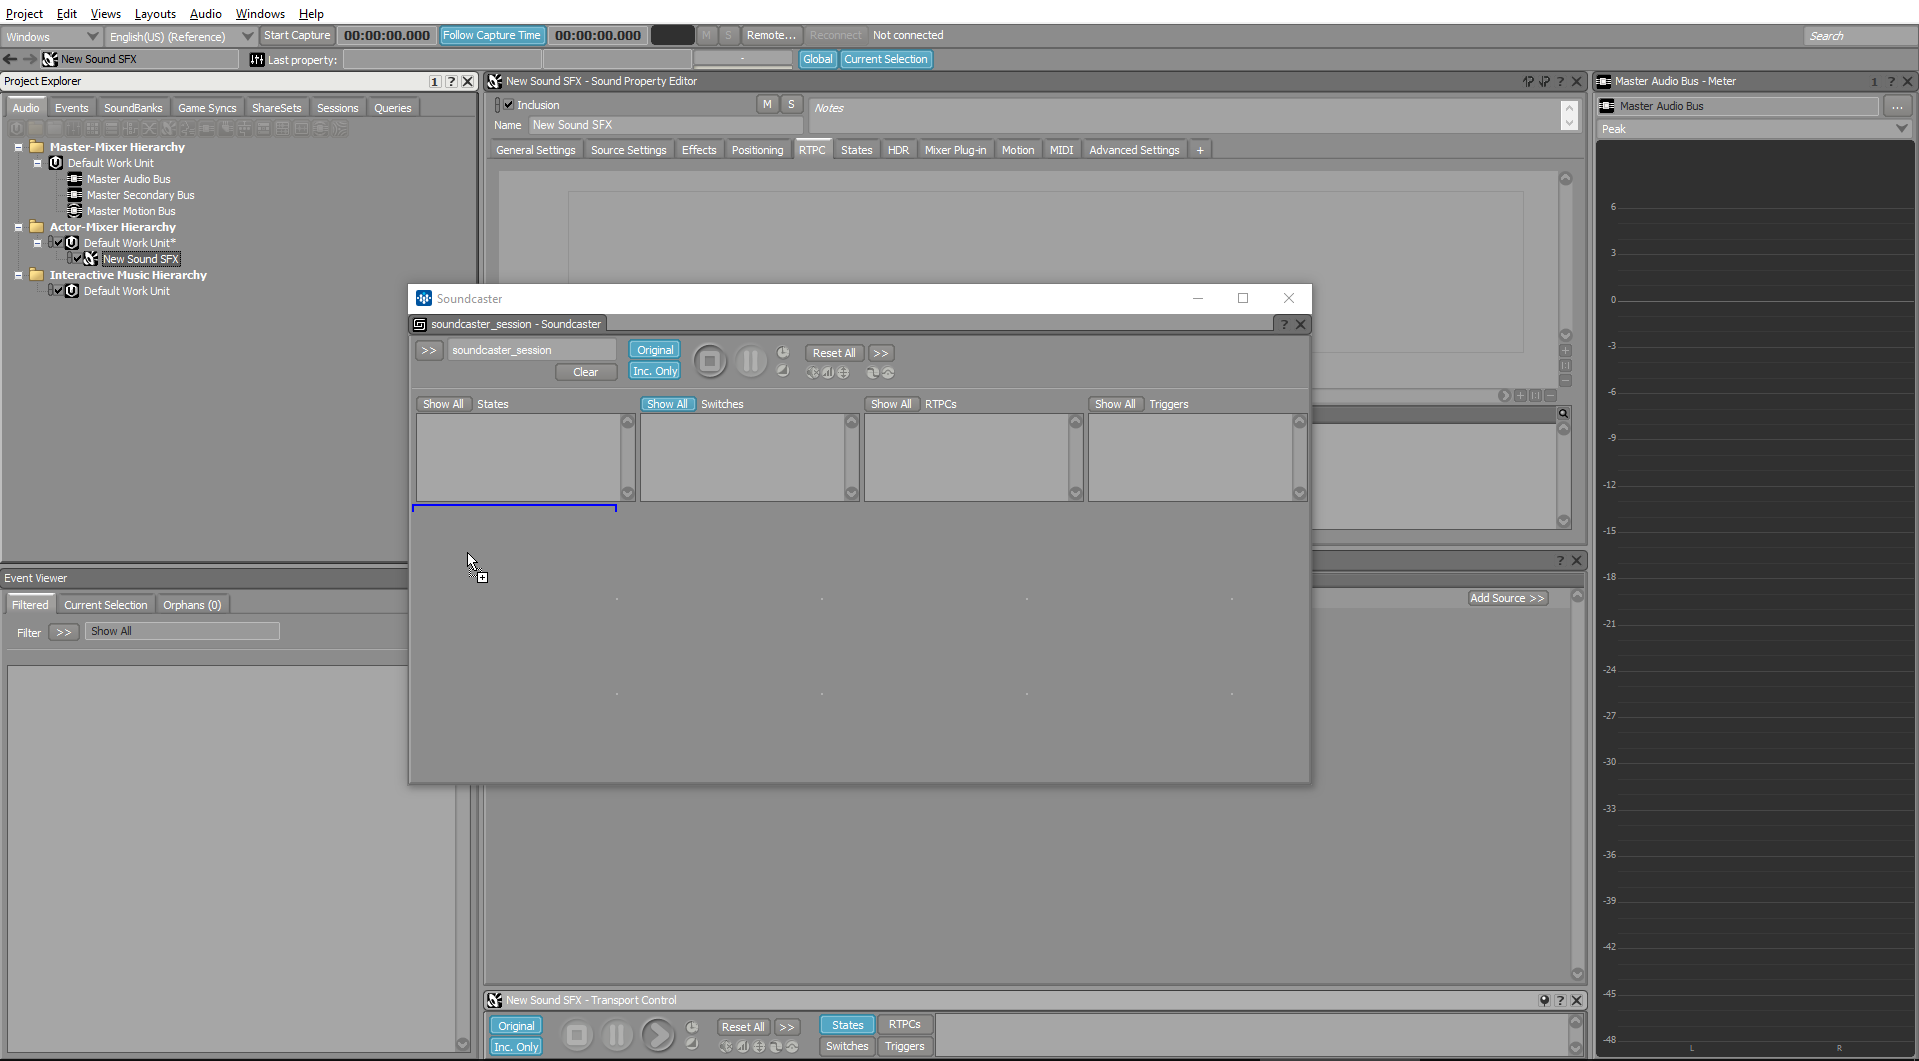
<p>Add a new sound to the soundcaster by dragging and dropping our sound in the Soundcaster windows, and click the <strong>Show All</strong> button on the right of the RTPCs label to show our <strong>master_volume</strong> parameter.</p>

<div class="onpage-screenshot">
	<img data-lity="" class="img-100" src="/assets/blog_master_volume/07_add_new_sound_to_soundcaster.png" />
</div>

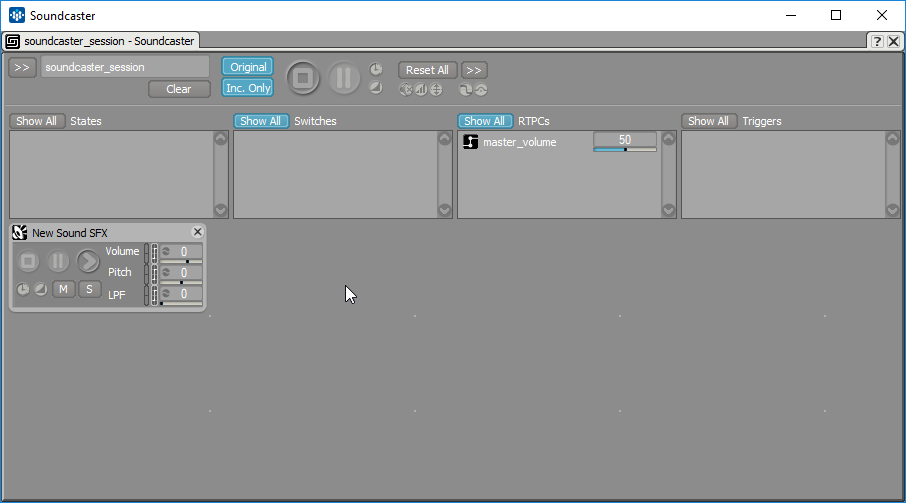
<p>In the end your soundcaster should look like that, and we can test our parameter directly by changing its value and playing our sound.</p>

<div class="onpage-screenshot">
	<img data-lity="" class="img-100" src="/assets/blog_master_volume/08_final_soundcaster.png" />
</div>

<p>This is the line you’ll need in Unity to change the RTPC value, where <strong>master_volume</strong> is the name of your RTPC and 100 the value you gave it. We didn’t change the base range, so our RTPC can go from 0 to 100.</p>

<figure class="highlight"><pre><code class="language-csharp" data-lang="csharp"><span class="n">AkSoundEngine</span><span class="p">.</span><span class="nf">SetRTPCValue</span><span class="p">(</span><span class="s">"master_volume"</span><span class="p">,</span> <span class="m">100</span><span class="p">);</span></code></pre></figure>

<p>I hope that this short tutorial helps you, if you’ve any question don’t hesitate to contact me :)</p>]]></content><author><name></name></author><category term="blog" /><summary type="html"><![CDATA[This tutorial will show you how to create a master volume controller with Wwise and Unity. The volume will be changed with a RTPC so we can control it in Unity.]]></summary></entry><entry><title type="html">Black video at Linux startup on a D2500HN motherboard</title><link href="https://www.rondeau-clement.eu//blog/2018/01/01/Fix-black-screen-at-Linux-startup-on-a-D2500HN-motherboard.html" rel="alternate" type="text/html" title="Black video at Linux startup on a D2500HN motherboard" /><published>2018-01-01T21:00:00+00:00</published><updated>2018-01-01T21:00:00+00:00</updated><id>https://www.rondeau-clement.eu//blog/2018/01/01/Fix%20black%20screen%20at%20Linux%20startup%20on%20a%20D2500HN%20motherboard</id><content type="html" xml:base="https://www.rondeau-clement.eu//blog/2018/01/01/Fix-black-screen-at-Linux-startup-on-a-D2500HN-motherboard.html"><![CDATA[<h2>The context</h2>
<p>To start the year I wanted to install a server so that I can work on my website from anywhere by SSH access, and store sensitive data on a RAID 1 setup so that I can react if one the HDD burn. Of course it doesn’t protect against all the other case of data loss like fire or flood, but it’s at least a beginning.</p>

<p>The server motherboard is a D2500HN from Intel, and it has an integrated video card. It sounds like an easy installation but nop, the video card drivers are supporting only Windows 7 32-bit and guess what ? It’s the integrated video card, so no more screen for you after a step during the boot.</p>

<h2>The fix</h2>
<p>I’ve tried with a Debian ISO and an Ubuntu ISO, it’s the same. I’ve then see that with the <strong>nomodeset</strong> kernel boot parameter, it tries to use the BIOS modes instead of the video drivers, but it doesn’t work in our case. For the moment the only solution I’ve found is to blacklist the driver.</p>

<p>To do so, when your computer starts keep the SHIFT key hold until you enter the GRUB home screen, it can also be made by smashing the E key to directly go to the configuration screen.</p>

<p>Once there you can add a new kernel boot parameter. Edit the linux line, add <strong>modprobe.blacklist=gma500_gfx</strong> at end of line just after <strong>ro</strong>. And boot your system by pressing CTRL+X, it should be good now. But if you restart you’ll have to do that again, so to make it permanent you can edit the file <strong>/etc/default/grub</strong> and add the command to the <strong>GRUB_CMDLINE_LINUX_DEFAULT</strong> parameter.</p>

<p>I hope it’ll help you, and if you’ve any tips on how to handle this issue in a better way feel free to contact me :)</p>]]></content><author><name></name></author><category term="blog" /><summary type="html"><![CDATA[Fix an integrated video card driver error at Linux startup.]]></summary></entry><entry><title type="html">Mondrian Tondrian</title><link href="https://www.rondeau-clement.eu//projects/school-project/2017/10/13/Jeux-dans-la-ville.html" rel="alternate" type="text/html" title="Mondrian Tondrian" /><published>2017-10-13T17:30:00+00:00</published><updated>2017-10-13T17:30:00+00:00</updated><id>https://www.rondeau-clement.eu//projects/school-project/2017/10/13/Jeux%20dans%20la%20ville</id><content type="html" xml:base="https://www.rondeau-clement.eu//projects/school-project/2017/10/13/Jeux-dans-la-ville.html"><![CDATA[<p>The few constraints we got was to create an experience that doesn’t require the user to look at a screen, and it must be created within a 100€ budget. The goal was to create <strong>an experience that is based on the city of Angoulême</strong>, and we picked a diversifier that was : “Artist that enter the public domain in 2015”, and Mondrian was one of them.</p>

<p>Our main idea was to generate <strong>a procedural music</strong> during the experience, and we found the idea of walking on a famous painting funny. The possibility to use the colored cells as a way to trigger the music was interesting to us, and it turned the installation into a cooperative experience.</p>

<p>The main difficulty that we encountered was the budget and the limited time, we got only 3 days in the week to calculate the fabric size, buy it and set it up.</p>

<p>My tasks on this project were to create an Android application that detect the color with the camera and fire an event to a server when the color has changed. To detect the color I first sum up all the r,g,b of all pixels and then calculte the average color, I then change this color from RGB space to the HSV space. With the H value I was able to detect the main colors (blue, red, yellow) and by checking the V value I detect when we avec a black cell.</p>

<p>I also had to create a Windows application that act as a server and receive the smartphones events in order to launch events on the Wwise sound engine. All the smartphones and the computer were connected to a smartphone that acted as a router.</p>]]></content><author><name></name></author><category term="school-project" /><summary type="html"><![CDATA[During the "Game in the city" seminar that lasted a week, we've created an interactive art installation based on a Mondrian's painting.]]></summary></entry><entry><title type="html">Globe Trotters</title><link href="https://www.rondeau-clement.eu//projects/school-project/2017/10/13/Objets-connectes.html" rel="alternate" type="text/html" title="Globe Trotters" /><published>2017-10-13T17:30:00+00:00</published><updated>2017-10-13T17:30:00+00:00</updated><id>https://www.rondeau-clement.eu//projects/school-project/2017/10/13/Objets%20connectes</id><content type="html" xml:base="https://www.rondeau-clement.eu//projects/school-project/2017/10/13/Objets-connectes.html"><![CDATA[]]></content><author><name></name></author><category term="school-project" /><summary type="html"><![CDATA[During the "Connected objects" seminar that lasted a week, we've created a game that can be played with an alternative controller.]]></summary></entry><entry><title type="html">ENJAM 2017</title><link href="https://www.rondeau-clement.eu//projects/personal-project/2017/10/08/ENJAM-2017.html" rel="alternate" type="text/html" title="ENJAM 2017" /><published>2017-10-08T09:00:00+00:00</published><updated>2017-10-08T09:00:00+00:00</updated><id>https://www.rondeau-clement.eu//projects/personal-project/2017/10/08/ENJAM%202017</id><content type="html" xml:base="https://www.rondeau-clement.eu//projects/personal-project/2017/10/08/ENJAM-2017.html"><![CDATA[<p>Our idea was that you’re playing a god and your tribe want to attack the other tribe, you must keep your soldiers on your side by picking them up and place them in your base.</p>

<p>My goal on this jam was to get a simple game fast (by the end of the first day) and polish it on the second day of the jam to get something that seems really finished.</p>

<p>By the end of the first day the main mechanics was working, only the special behaviors (a dash and a sprint effect for two special pieces) was to code. But the integration of the Wwise project took some time, I first had to learn how to use the switch system that enable to create an interactive music. And there were also sound effects that took more time to get in the game.</p>

<p>At the middle of the afternoon I implemented all the menus (main menu, lobby, credits, in-game pause and victory), and got the animations integrated one hour before the deadline. A Unity Collab pull got some of my modifications vanished, but the game is in the end fun to play even if the colliders need some rework and we could have discover that sooner with a playtest session with an other team.</p>

<p>This game jam was still one of my best because our workflow was very smooth and it was a joy to work on this game.</p>]]></content><author><name></name></author><category term="personal-project" /><summary type="html"><![CDATA[Rhythm versus fighting game made during the summer 2017.]]></summary></entry><entry><title type="html">Smartland</title><link href="https://www.rondeau-clement.eu//projects/personal-project/2017/09/12/Smartland.html" rel="alternate" type="text/html" title="Smartland" /><published>2017-09-12T17:30:00+00:00</published><updated>2017-09-12T17:30:00+00:00</updated><id>https://www.rondeau-clement.eu//projects/personal-project/2017/09/12/Smartland</id><content type="html" xml:base="https://www.rondeau-clement.eu//projects/personal-project/2017/09/12/Smartland.html"><![CDATA[<p>I’ve worked on this project as a freelance.</p>

<p>My task was to create an application that was lightweight (the user has to download and install it at the beginning) but that can play 35 differents videos when scanning the matching sticker. It also needed to be usable on a large range of devices, so it musn’t need a powerful CPU.</p>

<p>The trickiest part of the proect were :</p>

<ul>
  <li>The YouTube scrapping part, because a part of the videos are stocked on this website. For the other videos they are on Dropbox and it’s much easier to access, it doesn’t need to scrap the website.</li>
  <li>The video player on mobile. I have first tried to use the new video player of Unity that was integrated in the 5.6 version, but it doesn’t work on all the Android versions. So I’ve fallback to the Handheld.PlayFullScreenMovie method that work really well in the end.</li>
  <li>Get the application on the Apple Store. It has been a long journey with a few phone calls to get the app online, but I have learned a lot on the process and to always have some margin time because it takes a lot of time.</li>
</ul>

<p>This project was really great to do because the client got some high requirements and it has been challenging to meet all of them. In the end the exhibition is running smoothly and the staff was satisfied of the official opening.</p>]]></content><author><name></name></author><category term="personal-project" /><summary type="html"><![CDATA[Smartland is an exhibition about a fictional city where everything is smart. It's using an AR mobile application to discover the place.]]></summary></entry><entry><title type="html">Deadly Riff reboot</title><link href="https://www.rondeau-clement.eu//projects/personal-project/2017/09/01/DeadlyRiff-Reboot.html" rel="alternate" type="text/html" title="Deadly Riff reboot" /><published>2017-09-01T11:00:00+00:00</published><updated>2017-09-01T11:00:00+00:00</updated><id>https://www.rondeau-clement.eu//projects/personal-project/2017/09/01/DeadlyRiff%20Reboot</id><content type="html" xml:base="https://www.rondeau-clement.eu//projects/personal-project/2017/09/01/DeadlyRiff-Reboot.html"><![CDATA[<p>The goal of this project was to get a vertical slice from the previous prototype and under 2 months. The team grew to fit the new objectives, unfortunately at the end of the summer we only got a new prototype but with more content and mechanics. My tasks during the project were :</p>

<h2>Level design tool</h2>
<p>My first task on the project was to create a level design tool usable by our game designers. In order to gain some time on the project, I’ve searched for rhtythm game level design tool.</p>

<p>I’ve found “Editor On Fire” which is an open-source software used to create levels for the game “Frets On Fire”, it’s available on <a href="https://github.com/raynebc/editor-on-fire">Github</a> under the BSD 3-clause license. Its project file format is available and need to be readen byte per byte. To do so I’ve read the file and put all bytes in an array.</p>

<p>To read it I wanted to mimic the python list slice system, thanks to Linq it was possible to user the Skip() and Take() method to just get the bytes I wanted.</p>

<figure class="highlight"><pre><code class="language-csharp" data-lang="csharp"><span class="n">timingFormat</span> <span class="p">=</span> <span class="n">Convert</span><span class="p">.</span><span class="nf">ToBoolean</span><span class="p">(</span><span class="n">file</span><span class="p">.</span><span class="nf">Skip</span><span class="p">(</span><span class="m">20</span><span class="p">).</span><span class="nf">Take</span><span class="p">(</span><span class="m">1</span><span class="p">).</span><span class="nf">First</span><span class="p">());</span></code></pre></figure>

<p>Once I got the informations, I needed to convert them to a usable type, to do so I’ve created a simple utility class to convert bytes to a given type.</p>

<figure class="highlight"><pre><code class="language-csharp" data-lang="csharp"><span class="k">public</span> <span class="k">class</span> <span class="nc">EOFUtility</span> <span class="p">{</span>
  <span class="k">public</span> <span class="k">static</span> <span class="kt">int</span> <span class="nf">bytesToInt32</span><span class="p">(</span><span class="kt">byte</span><span class="p">[]</span> <span class="n">bytes</span><span class="p">)</span> <span class="p">{</span>
      <span class="k">return</span> <span class="n">BitConverter</span><span class="p">.</span><span class="nf">ToInt32</span><span class="p">(</span><span class="n">bytes</span><span class="p">,</span> <span class="m">0</span><span class="p">);</span>
  <span class="p">}</span>
  <span class="k">public</span> <span class="k">static</span> <span class="kt">int</span> <span class="nf">bytesToInt16</span><span class="p">(</span><span class="kt">byte</span><span class="p">[]</span> <span class="n">bytes</span><span class="p">)</span> <span class="p">{</span>
      <span class="k">return</span> <span class="n">BitConverter</span><span class="p">.</span><span class="nf">ToInt16</span><span class="p">(</span><span class="n">bytes</span><span class="p">,</span> <span class="m">0</span><span class="p">);</span>
  <span class="p">}</span>
  <span class="k">public</span> <span class="k">static</span> <span class="kt">char</span> <span class="nf">bytesToChar</span><span class="p">(</span><span class="kt">byte</span><span class="p">[]</span> <span class="n">bytes</span><span class="p">)</span> <span class="p">{</span>
      <span class="k">return</span> <span class="n">BitConverter</span><span class="p">.</span><span class="nf">ToChar</span><span class="p">(</span><span class="n">bytes</span><span class="p">,</span> <span class="m">0</span><span class="p">);</span>
  <span class="p">}</span>
<span class="p">}</span></code></pre></figure>

<p>With that system and a documentation that I had to write for the game designers, we got a new level design tool. Much more convenient than a handwritten JSON file.</p>

<h2>Game mechanics</h2>
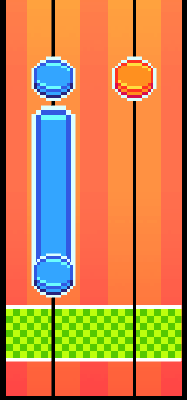
<p>The first mechanic that I wanted to add was the long note mechanic, the goal was to create notes that last and force the player to keep the button done while the note is played.</p>

<p>Thanks to the new tool, the level designers could create notes with a given length and with the parser I could get this data. To spawn a long note I spawn 3 objects, a head, a body and a tail. The head is a normal note that needs to be played, the tail wait the length time (500ms for example) before moving, and the body is an object between the head and the tail that is scaled on the Y axis to get the good size.</p>

<div class="onpage-screenshot">
  <img data-lity="" src="/assets/deadly_riff_reboot/long_note.png" />
</div>

<p>An other mechanic that was fun to work on was the “Super attack” and “Solos” system. The idea is that an invisible bar is filling up when you attack, play a long streak or block damages. When this bar is full you can launch a super attack that cause a lot of damage and put the opponent in the “Rock or die” status.</p>

<p>When one player is in “Rock or die” the main song is paused and a solo is launched, the player musn’t miss a note to succeed and reduce the inflicted damages. This mechanic required to use a timer that can be paused to know where we are in the main sond, and after a solo to start one measure back.</p>

<p>This was easily possible with Wwise, and the timer song was in the end given by the Wwise’s API.</p>]]></content><author><name></name></author><category term="personal-project" /><summary type="html"><![CDATA[Rhythm versus fighting game made during the summer 2017.]]></summary></entry><entry><title type="html">Axiome</title><link href="https://www.rondeau-clement.eu//projects/school-project/2017/06/01/Axiome.html" rel="alternate" type="text/html" title="Axiome" /><published>2017-06-01T22:30:00+00:00</published><updated>2017-06-01T22:30:00+00:00</updated><id>https://www.rondeau-clement.eu//projects/school-project/2017/06/01/Axiome</id><content type="html" xml:base="https://www.rondeau-clement.eu//projects/school-project/2017/06/01/Axiome.html"><![CDATA[<p>Axiome is our end of first year project at the CNAM-ENJMIN school. For this project we had the possibility to create a game that isn’t a video game, and we took this opportunity to create something on which we hadn’t worked on before : <strong>a site-specific experience</strong>.</p>

<p>The goal was to put a player in a familiar environment, like a grandma’s living room, and tell him : “You have 10 minutes to discover this place”, we also wanted to add the idea that <strong>behind a photo there is a story</strong>. It can be the place where the photo has been taken, the comment of the photograp, or a detail that can be hidden at first sight.</p>

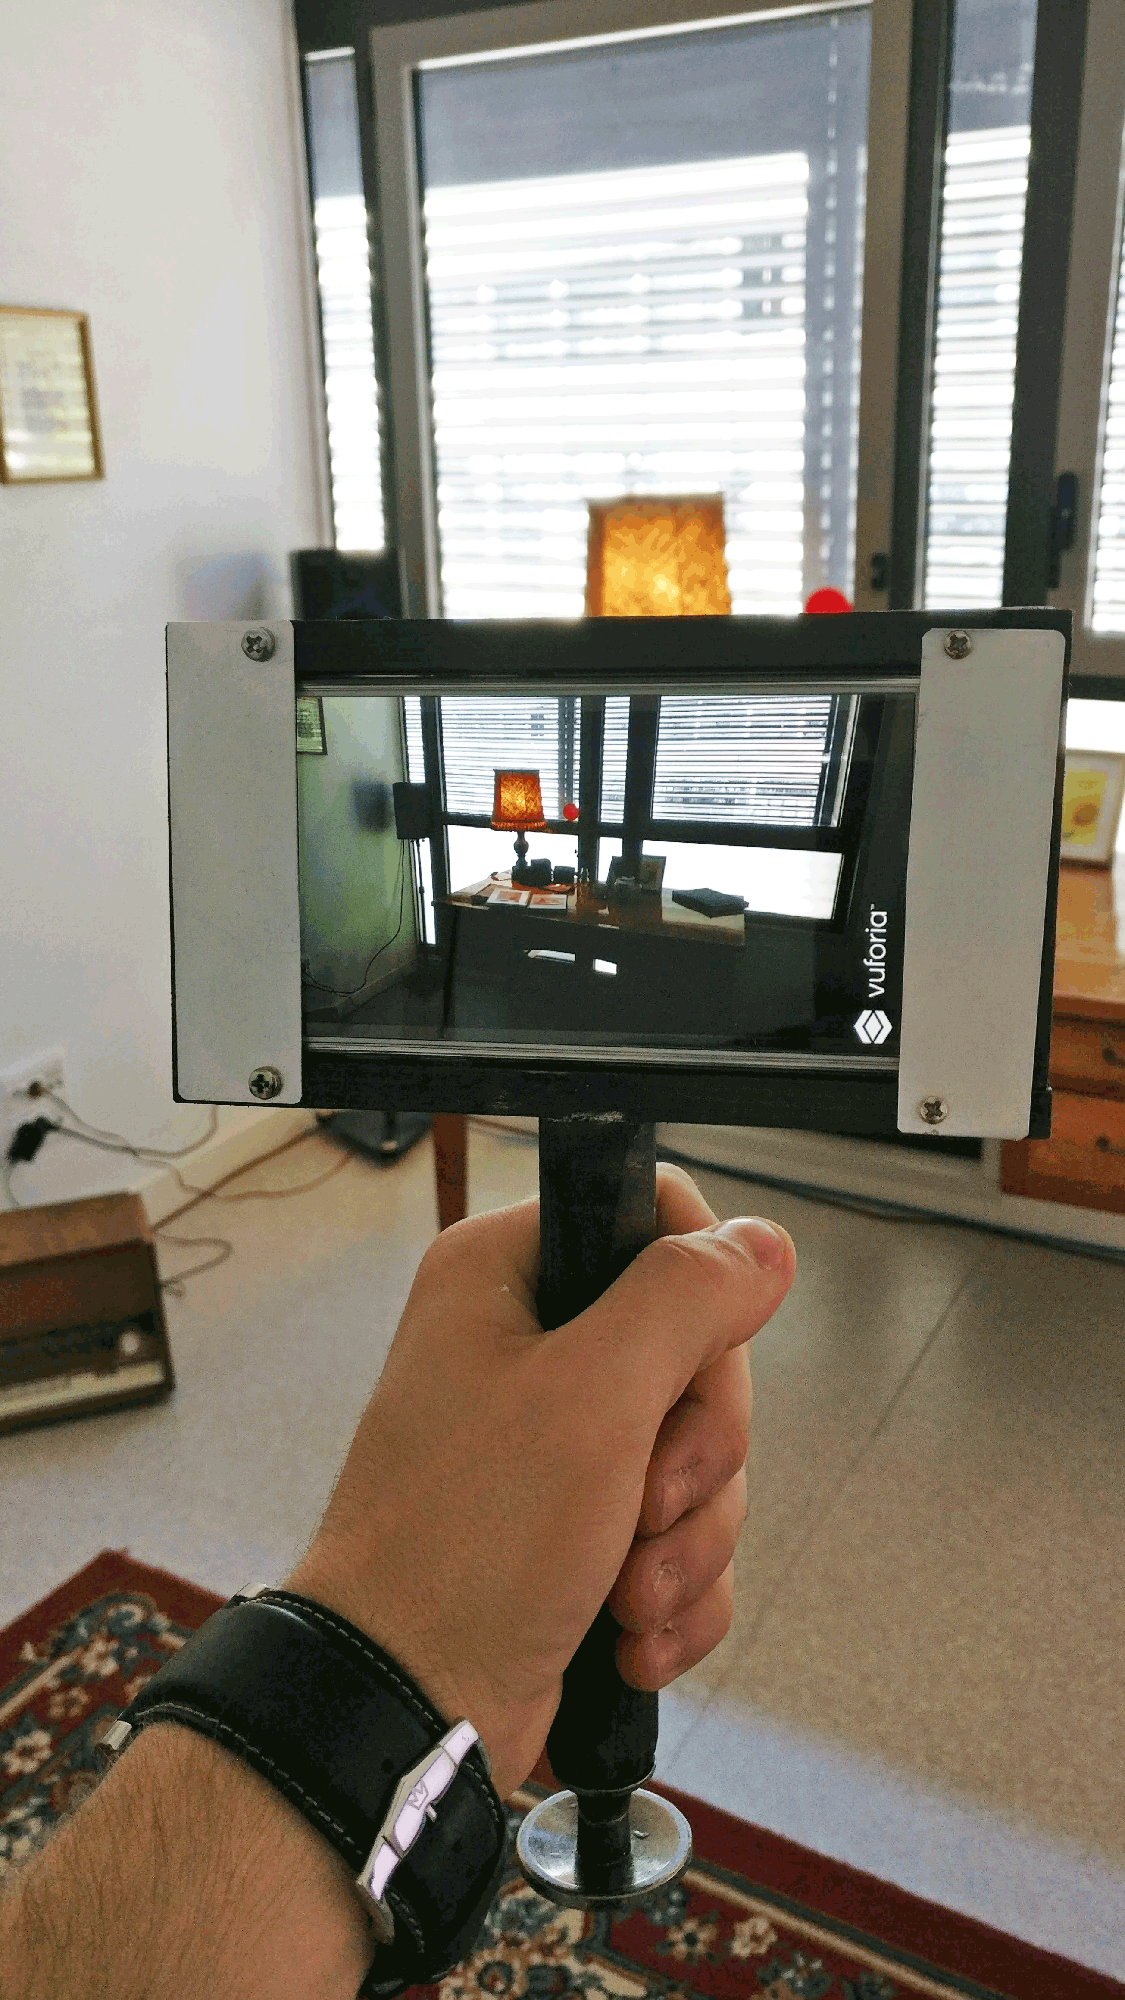
<p>To add this effect to the experience we added an AR application that recognize pictures drawn by our artist and replace them by an animated version. With that we were able to tell a story through 3 photo albums, and framed pictures.</p>

<p>My work on this project was to learn how to do AR with Unity, I choosed <strong>Vuforia</strong> because their documentation is complete and there is a good community around Vuforia/Unity projects.</p>

<p>I’ve quickly prototyped an application that was able to <strong>recoginize the first pictures done</strong> by Tara, to be sure that the art direction was accepted by Vuforia. After that I’ve worked on tools to help the integration because there was a lot of pictures and animations.</p>

<div class="onpage-screenshot">
    <img data-lity="" class="img-33" src="/assets/axiome/3.png" />
  </div>

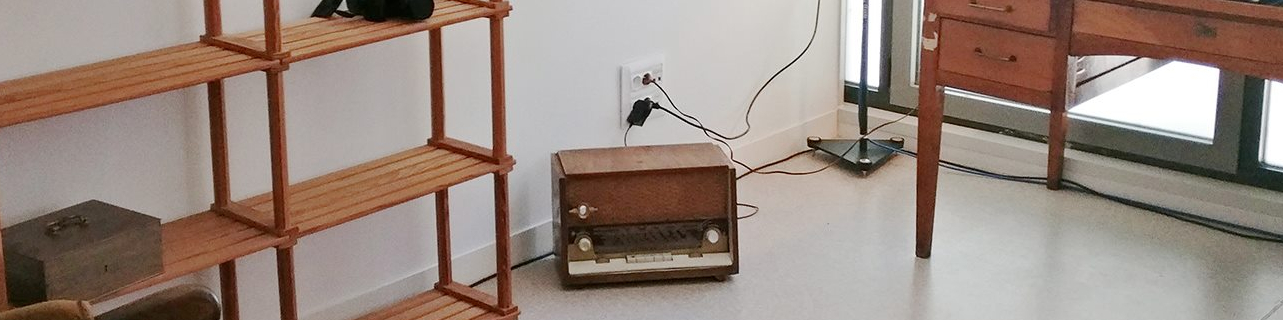
<p>In the middle of the project I’ve worked on something very different, when we started the project we’ve found an old radio that wasn’t working but it had been used for an old project and some wires were still here. It was perfect inside our room because it matched the time period we were targeting, and we also find the idea to create our own radio program very cool.</p>

<p>So I’ve worked with an <strong>Arduino</strong> to get inputs from the two main buttons (volume and frequency), the volume button was totally unusable so I’ve glued a magnet to it and placed a hall effect sensor to get the position of the magnet. Unfortunately the only sensor that I’ve wasn’t powerfull enough, so it was only usable as an on/off button.</p>

<p>The frequency button was usable and wires were already here, I only had to check the values that it was giving to get the position of the button and the targeted frequency. I’ve placed a range of frequencies were we hear the radio program, and on all the other frequencies we hear a white noise.</p>

<p>To play the sound I’ve used a <strong>RaspberryPI</strong> that was running a Raspbian on which a pygame program was launched at startup. This program was only reading inputs of the Arduino (it was used as an analog numeric converter in the end) and triggering sounds following the inputs.</p>

<div class="onpage-screenshot">
    <img data-lity="" class="img-100" src="/assets/axiome/7.jpg" />
  </div>

<p>To end the project I’ve worked on the server application that was monitoring the experience and was connected to the television where the player could see their progress, and the speakers that were playing house ambiant sounds to immerse the player and small feedback sounds when they were discovering new characters.</p>

<p>To help the installation I’ve also added an auto-connect system to the smartphone, because we knew that during the 2 days of presentation we were going to change the smartphone at least twice a day to charge it.</p>

<p>We are really proud of the project because a lot of players were <strong>embodying their role</strong> and some of them were also embarassed to search inside a room that wasn’t their. We encountered only one error on a smartphone swap but during the 2 days the application has worked seamlessly.</p>]]></content><author><name></name></author><category term="school-project" /><summary type="html"><![CDATA[Family interactive story that you discover through an AR device. Student project @ENJMIN.]]></summary></entry><entry><title type="html">Crazy toy city</title><link href="https://www.rondeau-clement.eu//projects/personal-project/2017/04/20/Ceci-n'est-pas-un-jeu.html" rel="alternate" type="text/html" title="Crazy toy city" /><published>2017-04-20T11:00:00+00:00</published><updated>2017-04-20T11:00:00+00:00</updated><id>https://www.rondeau-clement.eu//projects/personal-project/2017/04/20/Ceci%20n&apos;est%20pas%20un%20jeu</id><content type="html" xml:base="https://www.rondeau-clement.eu//projects/personal-project/2017/04/20/Ceci-n&apos;est-pas-un-jeu.html"><![CDATA[<p>The main difficulty that I’ve encountered in this game was the capture system. To keep in memory the position that the player has been through, I’ve partitioned the world in a grid and I’ve saved the cells on which the player has driven.</p>

<p>In a big compound array I’ve stored the building GameObject and the cells around it, if a player’s positions array contains all the cells around one building then he captures it.</p>

<p>Also, if a cell is going to be added to the player’s positions array then we know that he looped and we can remove its path and check if he captures a building.</p>]]></content><author><name></name></author><category term="personal-project" /><summary type="html"><![CDATA[Arcade party game where you must capture buildings by surrounding them with your car.]]></summary></entry></feed>